Featured Slider

Showing posts with label NOTD/ Nail Art. Show all posts

Review | Broadway imPRESS Press-On Manicure waterproof in ‘bells and whistles’

Review Broadway imPRESS Press-On Manicure waterproof in ‘bells and whistles’


Hello everyone! Today I am going to be reviewing the new version of the Broadway ImPRESS Press-On Manicure in the shade Bells and Whistles*. I have used the older version of these in the past and can give you a little insight on the differences, the main one being that these are waterproof and so will adhere to the nails better and last longer too! Also the new version includes a beautiful accent nail which really jazzes up the mani.


Review | Broadway imPRESS Press-On Manicure waterproof in ‘bells and whistles’

I love these packs of press on nails - quick, convenient and hassle-free. As someone who doesn’t wear nail polish often, when I do decide to paint my nails I tend to lack the patience because it’s so time consuming - Base coat, layer one, layer two, top coat, clean up....phew I’m feeling tired just thinking about it! That's where these come in and I think they're fantastic for special occasions especially because more often then not it's one of those last details that get left to the end and is easy to forget. These packs make it relatively easy to have a salon looking manicure in a matter of minutes and from the comfort of your own home. In fact when I tried the older version of these (the ones that come in a packet that is shaped like a nail polish bottle) I put them on whilst on a train to London and I was done in less than 10 minutes - impressive!

Review | Broadway imPRESS Press-On Manicure waterproof in ‘bells and whistles’
As you can see the instructions are clear and easy to read. Inside the box you are supplied with a little leaflet which clearly explains how to apply them, so they're very user-friendly. I was also impressed with how you are given a cleaning pad and a mini nail file too!

Review | Broadway imPRESS Press-On Manicure waterproof in ‘bells and whistles’


You are given 30 nails, 6 of which have a different design on them and they are thicker than the original version so do look more like a gel mani. I found it relatively easy to match the sizes to my finger nails, although it can be a little bit of a hit and miss for some, especially if you have larger thumbs or smaller hands. Basically you peel off the sticky tab and push the nail ontop of your own nails, et voila! A bit of pressing down and you are done. The size of these are short/medium and just how I like them, long enough to make my chubby hands feel a tad sophisticated, but not so long that I feel like I've grown coloured claws! The accent nail is my favourite in this particular set, I love how pretty the design is.

Review | Broadway imPRESS Press-On Manicure waterproof in ‘bells and whistles’
The actual colour of 'bells and whistles' isn't really my cup of tea, I would have preferred dark ones or even the pink ones, which have the most beautiful accent nails included too! I find these kinda Aqua shades tricky to work on with my brown skintone, however for cooler toned girls these would look beautiful!

You can purchase the new version from larger ASDA stores and the older versions are available on boots.com or online using a quick google search. Overall the addition of the accent nail makes a lovely change, however I think the quality between the older ones and the newer ones don't differ much. I expect these would last a little longer, I couldn't keep mine on for more than a day due to my job, but they remained strong when doing the washing up - so they do live up to their waterproof claim! I also didn't find them too challenging to take off which was a relief, so for anyone looking for a quick mani for a special occasion or event I highly recommend Broadway imPRESS ^_^

Final Verdict:
Product rating: 7.5 
Pros: Super easy to use, the instructions are clear, it comes with a preperation pad and  mini nail file, the the accent nail makes a interesting change to your standard manicure, gel like finish, length of the nails aren't too long or imprctible, easy enough to remove and basically for anyone who can't be bothered faffing about with nail polish or doesn't want to pay for a salon manicure, these make a good alternative! There are also a variety of colours and styles to choose from.
Cons: May not fit everyone's hands, the new range can be a little hard to get a hold of - I'll update this when they become more easy to find!
Repurchase? Yes I would, they're reliable, sturdy and easy to use. A must have for weddings in my opinion because I certainly don't have time to deal with smudgy nails!

Have you tried press-on Manicures before? What are your thoughts?


Thank-you for reading ♥


Review | Broadway imPRESS Press-On Manicure waterproof in ‘bells and whistles’

Review Broadway imPRESS Press-On Manicure waterproof in ‘bells and whistles’


Hello everyone! Today I am going to be reviewing the new version of the Broadway ImPRESS Press-On Manicure in the shade Bells and Whistles*. I have used the older version of these in the past and can give you a little insight on the differences, the main one being that these are waterproof and so will adhere to the nails better and last longer too! Also the new version includes a beautiful accent nail which really jazzes up the mani.

NOTD | A Classy Ciate Duo

ciate pain pot golden sands antique brooch lush bowtique coin necklace

ciate pain pot golden sands antique brooch lush bowtique coin necklaceciate pain pot golden sands antique brooch lush bowtique coin necklace

Hello ladies! I recently painted my nails in a completely different style to what I usually go for. OK..not COMPLETLY because yes that is glitter you see on my ring finger -  but hey I did try to refrain ._.

As soon as I opened up my fragrance direct package and saw how beautiful the shade Golden Sands was I needed to pop it on. Its a beautiful ‘dusty pink’ nude shade, but not just any old nude...a 90s nude, and we all know how classy that shade is! I’ve gotta admit, despite being someone who is not usually compelled to follow the trend, I am digging this whole 90s vibe ^_^

The colour ‘Antique Brooch’ which was a mini from one of the various gift sets from FD again, is SO beautiful! I wore this to my uncles wedding, three layers and I wish I had taken a clearer photo because those looks fabulous. To remove them was an experience I wouldn’t like to relive, so instead of layering it up, I just added one coat of Antique brooch onto my ring finger and voila! That little sparkle that I just can’t seem to get enough of was there!

I adore these two shades together, and I’m thinking of picking up the full size of Antique brooch which is gold glitter with flecks of pink. Ciate is a highend nail brand, with paint pots (full size) costing you £9 a bottle. However I only paid £2 for Golden Sands and although I adore the shade and the mini paint pots from previous gifts, I don’t understand why they charge double that of a highstreet polish. There was nothing special about the formula, after two and a half days (with a top coat on of course) the polish chipped....so I think its 100% worth the two quid, but I would hesitate to spent £9 on a basic bottle of the stuff when Barry M and Rimmel do just as good a job, if not better.

P.S The Gorgeous necklace is from the Instagram account: @LUSH_BOWTIQUE or find them on facebook here

Thanks for reading!

 Follow Via Bloglovin' | Tweet Me | Follow on Instagram | Like The Blushing Giraffe on Facebook

NOTD | A Classy Ciate Duo

ciate pain pot golden sands antique brooch lush bowtique coin necklace

Barry M Berry Cosmo | #JANBLOG 28

barry m berry cosmo review swatch nail paint polish
Barry M Berry Cosmo | LINK | £2.99

Hey ladies! Just a quick one today as I am snowed under by reading and an essay due in two days, so here is a #NOTD! I had a tough decision picking which colour this time around, and initially went for ‘blackberry’ which is more of a deep teal shade and also from their Gel finish/shine range. Something about it didn’t look quite right, so I swapped it for ‘Berry Cosmo’ which is one of their normal finishes. I picked this up last year and have to say I love the colour, I think it looks really nice against my skintone! (most don’t in my opinion) It’s also a pretty darn classy nail choice, which for a girl who loves to dollop glitter everywhere, is a rareity indeed.
barry m berry cosmo review swatch nail paint polish

Barry M is by far outnumbering the other brands in my nail polish collection, and I can’t really say a bad word against them! I’m super interested to try the Rimmel range though, after reading numerous good words about it over on Daphne’s blog (Subgenre Of A Dream – she is a lovely blogger, who’s also recently started a YouTube channel, check her out ^_^)

barry m berry cosmo review swatch nail paint polish
So back to the polish, I applied two coats, and didn’t have time for a top coat before I had to leave the house – and  it has not chipped at all, I'm pleased! It was a messy and rushed application though, my nail painting skills leave much to be desired! (Also flash is normally a no-no but it was the only way the colour was showing up properly in this terrible lighting.)
barry m berry cosmo review swatch nail paint polish

Although through the bottle it looks like a pinkish purple, when on the nails as you can see it’s more of a purple shade – which I LOVE because all my favourite’s are a purpleish something, that colour just sits well with me ^.^

For a couple of quid (and usually on offer) you can’t go wrong with Barry M nail paints, and next on my list after Spending Ban ofc is the black matte polish because which girl DOESN’T need one of those in her collection?!

I shall now love you and leave you, a hot cup of tea and Plato’s theory of Education awaits! but If anyone has any recommendations for a vibrant Royal Blue shade of nailpolish, (any brand but the cheaper the better) please let me know!

Barry M Berry Cosmo | #JANBLOG 28

barry m berry cosmo review swatch nail paint polish
Barry M Berry Cosmo | LINK | £2.99

NOTD– dotty for dots

Hello! This is just a quick little NOTD, featuring Barry M’s matte polish in Vanilla, which is strangely more of an off-white/lilac shade than anything remotely vanilla. I am a huggggge fan of Barry M so I was ultra excited to try these out. However when I painted my nails using just this polish they looked like this:
barry m vanilla matte nail polish
(As always do excuse my manly hands, rough cuticles and uneven nails..what can I say..I have little patience for pampering my hands ._. plus..it’s winter ok)

hmm. Slightly TOO plain and…flat you know? I dug out my wonderful ‘dotting tools’ purchased from Amazon: Set of 5 Multi Coloured Swirl Double Ended Nail Art Dotting/Marbleizing tools

for a ridiculously affordable price(LESS THAN £1.20!!), and I took out my most favourite shade of Nail polish EVER Barry M’s ‘cappuccino’ and got to work.

barry m nail paint matte vanilla and cappuccino

I say got to work as if this took my longer than 5 minutes, it’s the easiest thing to do! put a dollop of polish onto a card and dip the chosen dotter in..and get to dotting! I can’t think of a simpler way to jazz up your nails a little yourself, and really cannot recommend these tools enough.

barry m nail paint matte vanilla and cappuccino
nail dotting tools barry m

I know I’m not at all creative enough to buy a nail brush set, but these 5,  between them provide more than enough for anyone to get creative (check out my summer roses!)

Also the contrast between the matte and the normal looks sooo chic, I don’t think the camera QUITE picked up how chic it looks, but I assure you it looks a lot more professional than using two normal polishes haha.

When was the last time you jazzed up your mani?

(I’m seriously resisting the temptation to dollop glitter polish all over them…clearly I don’t do minimalism well)

NOTD– dotty for dots

Hello! This is just a quick little NOTD, featuring Barry M’s matte polish in Vanilla, which is strangely more of an off-white/lilac shade than anything remotely vanilla. I am a huggggge fan of Barry M so I was ultra excited to try these out. However when I painted my nails using just this polish they looked like this:
barry m vanilla matte nail polish

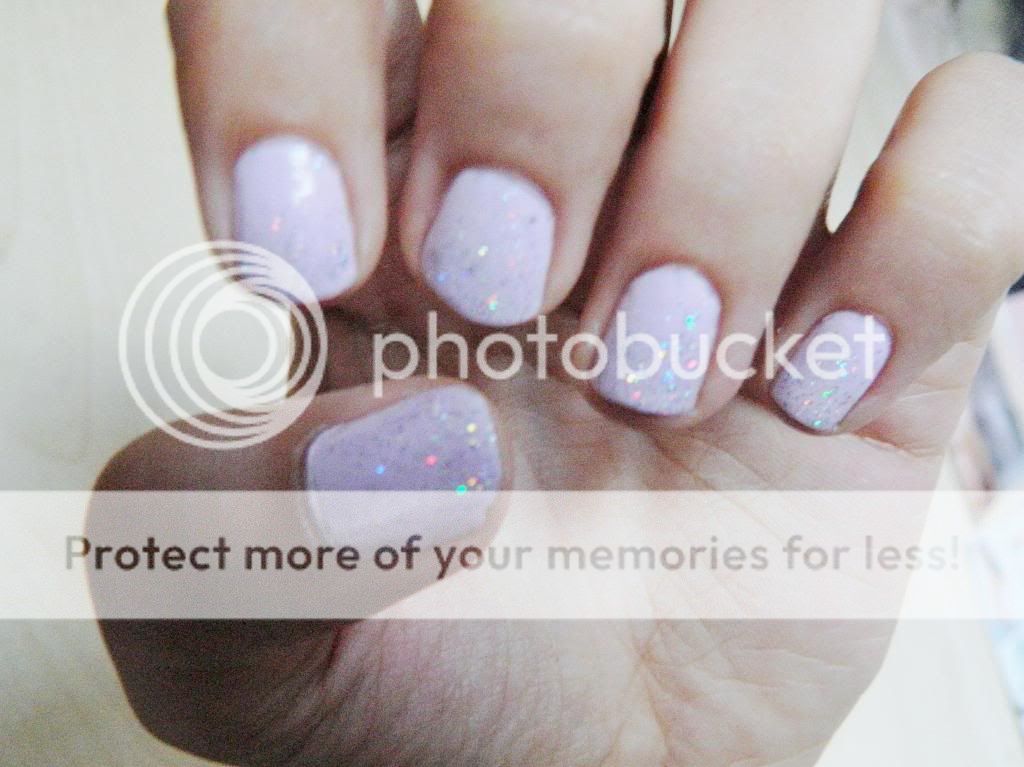
Lilac Glitter Ombre Nails!

lilac glitter ombre nail art

Apologies for the vast difference in pictures, but I have always been terrible with taking photos of nails..on top of that this colour by MUA is abit of an odd one because in some lights it appears pink and others more lilac. My hands are hardly the daintiest and in general I don’t tend to dress up my nails, so when I do it’s at least worth a blog post right? 


To create a lilac glitter ombre you will need:
  • A lilac polish (I used MUA’s lush lilac)
  • A glitter polish (Mine is Barry M’s silver glitter and I think this is the most gorgeous glitter shade because the rainbow effect of the particles make it look almost holographic ^_^)
  • A clear polish

lilac glitter ombre nail art

Step 1: Paint two or three coats of the lilac polish (however many coats needed for an opaque finish and allow to dry)

Step 2: Paint the nail from 3/4 of the way up with one layer of glitter polish. Let this dry before moving on.

Step 3: This time starting from the middle of the nail, paint one even layer of the glitter polish.

Step 4: Once the glitter has dried and is not tacky in the slightest, paint 1 or 2 layers on the last quarter (tip) of the nail so most of the glitter is concentrated on the white part of a French manicure.

Finally – finish with a clear polish to prolong your pretty nails and clean up any mess with cotton buds and nail polish remover

et voila!

Lilac Glitter Ombre Nails!

lilac glitter ombre nail art

Summer Nail Art– Roses

Hello ^_^
So a while back I purchased these nail art dotting tools from Amazon and I have to say they are pretty awesome, especially for that price!

I’ve created one or two different looks, but haven’t really had the time to spend ages over my nails. I’m certainly not the type of girl who’ll weekly use a nail file and buffer to make sure my nails are in tip-top condition and I’ve always wished I had slender, pretty hands but mine are the clumsy type – which nonetheless work perfectly fine so I can’t complain haha.

Occasionally I like to attempt being creative and so I thought I’d share this summery look.
 (Please excuse the messy pre-cleanup, I forgot to take some pictures after I’d gone around the nails with a handy cotton bud!)
Nail Art
RED ROSE NAIL ART
The leaves aren’t actually that neat this close up, but it’s been zoomed in a lot. In real life they really do look like little leaves :)
ROSE NAIL ARTROSE NAIL ART
Roses are my absolute favourite flower, and I adore this green colour by Essie!


Nail Polishes used:
ELF, BARRY M, TOPSHOP, ESSIE, RIMMEL
From L-R: Barry M Basecoat, Topcoat and Nail Hardener, Elf in Nude, Topshop in Easy Breezy, Beauty UK in Golden Claret, Essie in Mojito Madness and Rimmel London in Pure Sin.
Do you enjoy experimenting with your nails from time to time or are you more of a one shade kinda person?
Iqra x

Summer Nail Art– Roses

Hello ^_^
So a while back I purchased these nail art dotting tools from Amazon and I have to say they are pretty awesome, especially for that price!

I’ve created one or two different looks, but haven’t really had the time to spend ages over my nails. I’m certainly not the type of girl who’ll weekly use a nail file and buffer to make sure my nails are in tip-top condition and I’ve always wished I had slender, pretty hands but mine are the clumsy type – which nonetheless work perfectly fine so I can’t complain haha.

Occasionally I like to attempt being creative and so I thought I’d share this summery look.